In today’s data-driven world, understanding your website's performance is essential. Google Analytics (GA) is a powerful tool for this, but integrating it with Webflow can be challenging for some.
In this article, we will explain the process of connecting GA with Webflow. Moreover, we will compare the traditional method with the innovative approach offered by Data Goat, a Webflow app made to bridge the gap between GA and Webflow. Read on.
Connecting Google Analytics with Webflow: The Traditional Way
Here’s how to make the basic connection between GA and Webflow.
Creating a Google Analytics Account
- Sign Up — Visit the Google Analytics website and sign up for a new account.
- Set Up Property — Create a 'Property' in GA. This represents your website and is where your data will be collected.
- Obtain Tracking ID — Once your property is set up, GA will provide a unique Tracking ID (in the format 'UA-XXXXXXXXX-X'). This ID links your Webflow site to your GA account.
Accessing Webflow's Project Settings
- Log Into Webflow — Enter your Webflow dashboard and select the project you wish to track.
- Navigate to Setting— In your project dashboard, locate the 'Settings' tab.
- Find the Analytics Section — Inside settings, scroll to the 'Analytics' section, which is specifically designed for integrating external tracking tools like GA.
Integrating the Tracking ID
- Paste the Tracking ID — In the Analytics section, there's a field for your GA Tracking ID. Paste your ID here.
- Configure Advanced Settings (Optional) — If needed, set up additional tracking options, like domain tracking or subdomain tracking, which GA supports.
Publish Your Changes
- Save and Publish — After entering your Tracking ID, save your changes and then publish your Webflow site.
- Verify Integration — It's recommended to check in GA if the tracking is active, which might take up to 24 hours.
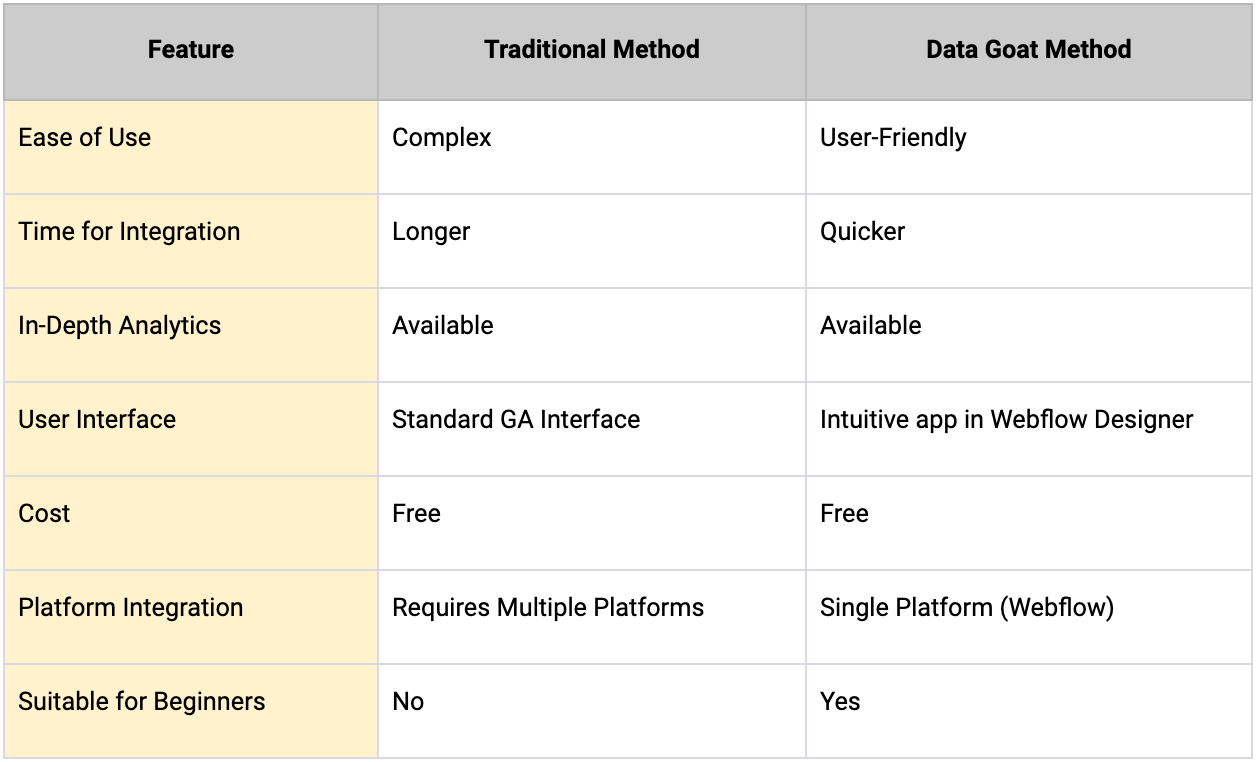
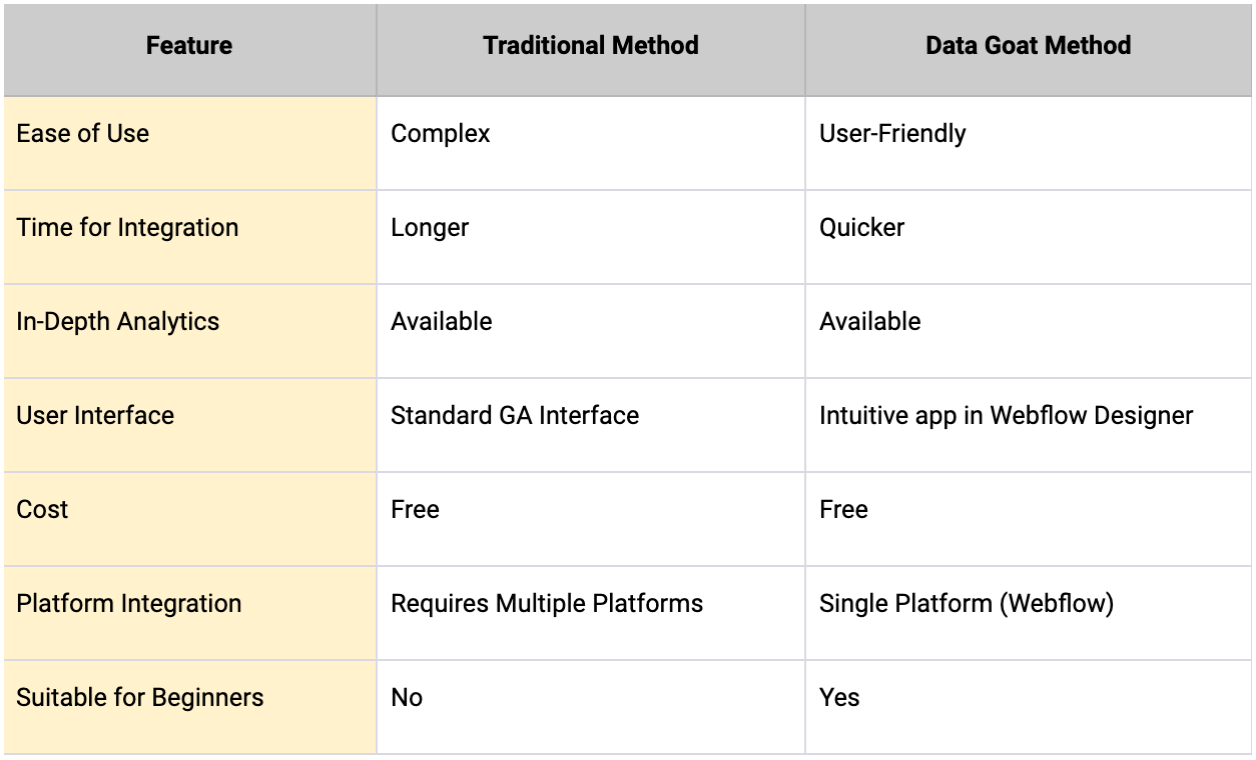
By following these steps, you'll be able to connect Google Analytics to your Webflow site traditionally. This process, while effective, requires a good understanding of both GA and Webflow's settings and involves multiple steps and platforms.
Streamlining GA Connection with Data Goat
Data Goat simplifies this process by offering a direct integration within the Webflow Designer, making the setup quicker and more intuitive.
- Installing Data Goat — Within the Webflow Designer, locate the apps option and install Data Goat.
- Open an Account — If you’re new to Data Goat, you will need to register an account and access the main dashboard.
- Connecting your Webflow Project — In the main dashboard, you’ll be prompted to connect a project for which you want to track analytics.
- Connecting to Google Analytics — Seamlessly link Data Goat to your GA account. This process bypasses the need for dealing with tracking IDs manually.
- Viewing Analytics in Real-Time — Start monitoring your site’s performance immediately, with all your GA data accessible directly within Webflow.
Why Choose Data Goat
Here are the main reasons to use Data Goat for Webflow analytics.
- User-Friendly Interface — Data Goat’s intuitive design is ideal for users who are not familiar with GA’s complexities.
- Efficient Setup — The integration process is significantly quicker, reducing the time from setup to data analysis.
- Free and Accessible — Data Goat is a cost-effective solution, making advanced analytics accessible to all Webflow users, regardless of their budget.
- All-in-One Platform — By keeping everything within Webflow, Data Goat eliminates the need to juggle multiple platforms, streamlining your workflow.
Conclusion
Integrating Google Analytics with Webflow doesn’t have to be a complicated task. While the traditional method works, Data Goat provides a much simpler, faster, and more user-friendly way to track your website’s analytics.
This approach aligns with the needs of modern web designers and marketers who value efficiency and ease of use. Embrace the innovative solution that Data Goat offers and take your Webflow analytics to the next level.
.webp)
.png)

